개요
geeknews를 보다가 SQLite Soul이라는 재미있는 오픈소스 프로젝트가 있어서 한번 직접 실습해 보고 해당 내용을 포스팅해보려고 합니다. 실습 위주다 보니 글이 길어질 수 있는 부분이 있어서 2개의 글로 나누어서 작성합니다.
SQLite Soul이란
SQLite 용 Realtime REST 서버를 제공하는 오픈소스 프로젝트입니다. 요약해서 말하면 SQLite 만으로 아무런 개발 구현 없이 RESTful API 서버를 만들어 볼 수 있습니다.
https://thevahidal.github.io/soul/
사전준비
해당 프로젝트를 실제로 수행하기 위해서는 아래사항이 필요합니다.
- SQLite
- nodejs
SQLite 설치
- mac에서 설치
1brew install sqlite
- Linux 설치 (Debian 계열)
nodejs 설치
- mac에서 설치
1brew install node
- Linux 설치 (Debian 계열)
설치확인
- node 설치확인
- sqlite 설치확인
Soul 설치
위에 사전준비를 모두 마치면 npm을 이용해서 Soul 설치를 진행합니다.
1 npm install -g soul-cli
설치가 정상적으로 되었다면 soul을 입력했을 때 아래처럼 출력이 됩니다.
 1> soul
 2
 3Usage: soul [options]
 4
 5Options:
 6            --version                         Show version number                                 [boolean]
 7  -d,       --database                        SQLite database file or :memory:                    [string] [required]
 8  -p,       --port                            Port to listen on                                   [number]
 9  -r,       --rate-limit-enabled              Enable rate limiting                                [boolean]
10  -c,       --cors                            CORS whitelist origins                              [string]
11  -a,       --auth                            Enable authentication and authorization             [boolean]
12
13  --iuu,     --initialuserusername             Initial user username                               [string]
14  --iup,     --initialuserpassword             Initial user password                               [string]
15
16  --ts,      --tokensecret                     Token Secret                                        [string]
17  --atet,    --accesstokenexpirationtime       Access Token Expiration Time    (Default: 5H)       [string]
18  --rtet,    --refreshtokenexpirationtime      Refresh Token Expiration Time   (Default: 1D)       [string]
19  -S,       --studio                          Start Soul Studio in parallel
20  --help                                      Show help
SQLite 데이터 준비
Soul의 테스트를 위해서 SQLite 데이터베이스에 재고 관리 프로그램을 위한 상품(Product)과 재고(Inventory) 테이블을 만들고 샘플 데이터를 삽입했습니다.
Product 테이블
- id: 상품의 고유 번호
- name: 상품 이름
- category: 상품 카테고리
- price: 상품 가격
| id | name | category | price |
|---|---|---|---|
| 1 | Laptop | Electronics | 1200 |
| 2 | Mouse | Electronics | 25 |
| 3 | Keyboard | Electronics | 45 |
| 4 | Monitor | Electronics | 150 |
| 5 | Chair | Furniture | 85 |
Inventory 테이블
- product_id: 상품의 고유 번호 (Product 테이블의 id와 연결)
- quantity: 재고 수량
| product_id | quantity |
|---|---|
| 1 | 10 |
| 2 | 20 |
| 3 | 15 |
| 4 | 17 |
| 5 | 8 |
스크립트
- 데이터베이스 생성
1sqlite3 inventory.db
- DDL 및 데이터 삽입
 1CREATE TABLE Product (
 2    id INTEGER PRIMARY KEY,
 3    name TEXT NOT NULL,
 4    category TEXT NOT NULL,
 5    price DECIMAL NOT NULL
 6);
 7
 8CREATE TABLE Inventory (
 9    product_id INTEGER NOT NULL,
10    quantity INTEGER NOT NULL,
11    FOREIGN KEY(product_id) REFERENCES Product(id)
12);
13
14INSERT INTO Product (id, name, category, price) VALUES
15(1, 'Laptop', 'Electronics', 1200),
16(2, 'Mouse', 'Electronics', 25),
17(3, 'Keyboard', 'Electronics', 45),
18(4, 'Monitor', 'Electronics', 150),
19(5, 'Chair', 'Furniture', 85);
20
21INSERT INTO Inventory (product_id, quantity) VALUES
22(1, 10),
23(2, 20),
24(3, 15),
25(4, 17),
26(5, 8);
위에 스크립트를 모두 수행하고 종료하게 되면 테스트를 위한 데이터 세팅이 모두 완료됩니다. (inventory.db)
서버 실행
아래 명령어를 수행해서 SQLite 기반의 Realtime API 서버를 8000번 포트로 올려봅니다
1soul -d inventory.db -p 8000
2
3Warning: Soul is running in open mode without authentication or authorization for API endpoints.
4Please be aware that your API endpoints will not be secure.
5No extensions directory provided
6Soul is running...
7 > Core API at http://localhost:8000/api/
위에 서버가 수행이 되면 테이블을 기반으로 RESTful API 서버가 운영이 됩니다. 현재 저희가 만든 테이블은 상품(Product)과 재고(Inventory)인데 상품 관련 데이터를 모두 조회하고 싶으면 아래처럼 호출하면 됩니다.
- Product 테이블 호출
1curl -X GET http://localhost:8000/api/tables/Product/rows
- 호출 결과
 1{
 2   "data":[
 3      {
 4         "id":1,
 5         "name":"Laptop",
 6         "category":"Electronics",
 7         "price":1200
 8      },
 9      {
10         "id":2,
11         "name":"Mouse",
12         "category":"Electronics",
13         "price":25
14      },
15      {
16         "id":3,
17         "name":"Keyboard",
18         "category":"Electronics",
19         "price":45
20      },
21      {
22         "id":4,
23         "name":"Monitor",
24         "category":"Electronics",
25         "price":150
26      },
27      {
28         "id":5,
29         "name":"Chair",
30         "category":"Furniture",
31         "price":85
32      }
33   ],
34   "total":5,
35   "next":null,
36   "previous":null
37}
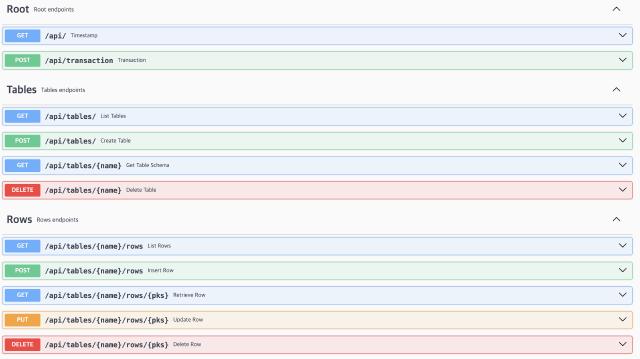
위에처럼 단순히 soul을 통해서 SQLite를 연결했을 뿐인데 요청들이 실제 API 서버를 구현한 것처럼 노출되는 것을 확인할 수 있습니다. 심지어 localhost:8000/api/docs 을 들어가 보면 관련 API 관련 Swagger도 만들어주는 것을 확인할 수 있습니다.

정리
해당 포스팅을 통해서 Soul 프로젝트에 대해서 알아보고 실습을 위한 사전 작업들을 진행하였습니다. 간단하게 SQLite에 저장되어 있는 테이블을 기반으로 서버를 통해 호출되는 모습을 보았고 다음 번 포스팅에서는 Soul에서 제공하는 인증 관련 기능들과 CRUD 기능들에 대해서 좀 더 깊게 다뤄보겠습니다.
